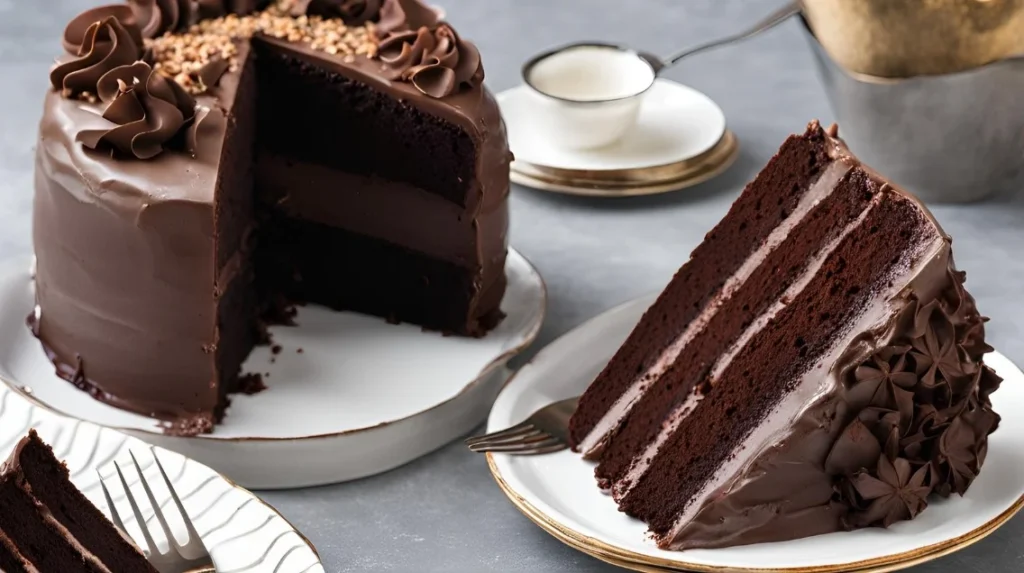
Some cakes stay in your memory forever. I still remember the first time I tasted Matilda Chocolate Cake something so rich, dark, and moist that it felt unreal.
That was the moment I knew I had to recreate it. After years of baking and tweaking, I finally mastered the ultimate Matilda Chocolate Cake.
This Matilda Chocolate Cake is deeply chocolatey, soft, and unapologetically indulgent. Every bite melts in the mouth and satisfies even the strongest chocolate cravings.
I make it when I want to impress or just treat myself to something truly special. It’s one of my top recipes for a reason.
I’ve baked this Matilda Chocolate Cake more times than I can count, and every single time, it gets rave reviews. Let me show you how I do it.
What Makes a Matilda Cake Special?
1. Rich and Moist Texture: The secret lies in the perfect balance of ingredients, ensuring a tender and fudgy crumb.
2. Intense Chocolate Flavor: High-quality cocoa powder and sometimes a touch of coffee enhance the chocolate taste.
3. Luscious Frosting: A thick, velvety chocolate frosting complements the cake perfectly.
How To Prepare Matilda Chocolate Cake?
Recipe Overview
Prep Time: 30 minutes
Cook Time: 35 minutes
Total Time: 65 minutes
Course: Dessert
Cuisine: American
Calories: 300
Yield: 12 servings
Kitchen Utensils Needed
- 2 Mixing bowls
- Whisk and spatula
- Electric mixer (optional)
- Measuring cups and spoons
- Two 9-inch round cake pans
- Saucepan
- Wire cooling rack
- Serrated knife (for leveling, optional)
Ingredients Needed
For the Chocolate Cake:
- 2 cups (240g) all-purpose flour
- 2 cups (400g) granulated sugar
- ¾ cup (65g) unsweetened cocoa powder
- 1 tsp baking soda
- 1 tsp baking powder
- 1 tsp salt
- ⅓ cup (80ml) buttermilk
- ⅓ cup (80ml) whole milk
- 1 tsp white vinegar
- ½ cup (120ml) vegetable oil
- 2 large eggs
- ⅔ cup (135g) light brown sugar
- 1 cup (240g) sour cream
- ¾ cup (180ml) boiling water
- 1 cup (240ml) hot brewed coffee
- 1 tsp vanilla extract
For the Chocolate Fudge Frosting:
- 8 oz (225g) cream cheese, softened
- 3 to 4 cups (360–480g) powdered sugar, to taste
- ½ cup (45g) cocoa powder
- ¼ cup (60ml) heavy cream
- 300g (10.5 oz) dark chocolate, melted
- 3 tbsp corn syrup
- ¼ tsp salt
How To Make Matilda Chocolate Cake
1. Preheat Oven and Prepare Pans
Preheat your oven to 350°F (175°C). Grease and flour two 9-inch round cake pans or line them with parchment paper.
2. Mix Dry Ingredients
In a large bowl, whisk together the flour, granulated sugar, cocoa powder, baking soda, baking powder, and salt until well combined.
3. Combine Wet Ingredients
In a separate bowl, whisk the buttermilk, whole milk, vinegar, vegetable oil, eggs, brown sugar, sour cream, and vanilla extract until smooth.
4. Combine Wet and Dry
Gradually add the wet ingredients to the dry ingredients. Mix until just combined, scraping down the sides of the bowl as needed.
5. Add Hot Liquids
Carefully stir in the boiling water and hot coffee. The batter will be thin—this helps make the cake moist and rich.
6. Bake
Divide the batter evenly between the two prepared pans. Bake for 30–35 minutes or until a toothpick inserted in the center comes out clean.
7. Cool the Cakes
Allow the cakes to cool in the pans for 10 minutes, then transfer them to a wire rack to cool completely before frosting.
8. Prepare Frosting
In a large mixing bowl, beat the cream cheese until smooth. Gradually add powdered sugar, cocoa powder, and salt. Stir in the heavy cream, melted dark chocolate, and corn syrup until smooth and fluffy.
9. Assemble the Cake
Once cakes are fully cooled, level them if needed. Place one layer on a cake stand, spread frosting evenly on top, then add the second layer. Cover the entire cake with the remaining frosting.
10. Chill and Serve
Refrigerate the cake for at least 30 minutes to set the frosting. Slice and serve at room temperature for best texture and flavor.
Special Note
For the best flavor, I recommend making this cake a day in advance. Letting it sit overnight allows the flavors to meld together, making the cake even more moist and chocolatey.
Store the cake in an airtight container at room temperature, or refrigerate it if you prefer a firmer texture.
Why Is Matilda Cake Famous?
The Matilda cake gained fame from a memorable scene in the movie Matilda, where Bruce, a young boy, must eat a massive chocolate cake as a form of punishment.
This dramatic and unforgettable moment made the cake iconic, inspiring many bakers to recreate their own versions.
Over time, the cake’s popularity grew, with some bakeries even crafting special editions celebrating Bruce’s famous “cake challenge.”
This connection to the film has turned the Matilda cake into a beloved treat that combines nostalgia with rich, indulgent flavor.
Why Is Matilda Cake Famous?
The cake in Matilda is simply known as the “giant chocolate cake” or sometimes called “Bruce’s cake.” It became famous because of the unforgettable scene where Bruce is forced to eat the enormous chocolate cake as punishment.
This iconic moment has made the cake a symbol of the movie and inspired many to recreate it in real life.
Tips For Best Results
➢ Use room temperature ingredients to help everything blend smoothly.
➢ Sift dry ingredients to avoid lumps and ensure a light texture.
➢ Gently fold wet and dry ingredients together to keep the batter airy.
➢ Use fresh baking powder and baking soda for proper rise.
➢ Brew fresh, hot coffee to enhance the chocolate flavor.
➢ Grease and flour your pans well to prevent sticking.
➢ Let the cake cool completely before frosting to avoid melting the frosting.
➢ Store the cake covered in the fridge to keep it moist and fresh longer.
Serving Ideas Matilda Chocolate Cake
Serve Matilda Chocolate Cake with a scoop of vanilla ice cream or a dollop of whipped cream to balance its rich chocolate flavor.
Fresh berries or a drizzle of caramel sauce add a beautiful contrast and extra sweetness. For a special touch, sprinkle crushed nuts or chocolate shavings on top.
Pair it with a hot cup of coffee or milk for the ultimate indulgence. These simple ideas turn every slice into a memorable treat.
Additions And Variations
Here are some additions and variations to make your Matilda Chocolate Cake even more exciting:
➤ Add Chocolate Chips: Fold in ½ cup of semi-sweet chocolate chips into the batter for extra gooey pockets of chocolate.
➤ Use Espresso Powder: Replace hot coffee with espresso for a richer, more intense coffee flavor.
➤ Add Nuts: Mix in chopped walnuts or pecans for a crunchy texture.
➤ Fruit Twist: Layer the cake with fresh raspberries or strawberries for a fruity contrast.
➤ Spicy Kick: Add a pinch of cinnamon or cayenne pepper to the dry ingredients for a subtle warmth.
➤ Frosting Variations: Swap the cream cheese frosting for whipped ganache or buttercream.
➤ Vegan Version: Use plant-based milk and egg substitutes for a dairy-free, vegan-friendly cake.
➤ Mini Cakes: Bake as cupcakes for individual servings perfect for parties.
How Do I Store This Cake?
To store Matilda Chocolate Cake, keep it covered in an airtight container or wrap it tightly with plastic wrap. Store it in the refrigerator to keep the frosting fresh and the cake moist.
Before serving, let the Matilda Chocolate Cake come to room temperature for the best flavor and texture. It will stay good for up to 4-5 days this way.
For longer storage, you can freeze the Matilda Chocolate Cake layers separately, wrapped well, for up to 2 months. Thaw in the fridge overnight before frosting and serving.
(FAQs) about the Chocolate Matilda Cake:
Can I use a different type of flour for this recipe?
Yes, you can use cake flour for a lighter texture or whole wheat flour for a slightly denser, more nutritious cake. However, the cake’s texture will change slightly depending on the flour used.
Can I make this cake ahead of time?
Absolutely! In fact, this cake tastes even better the next day. You can bake the cake layers in advance and store them wrapped in plastic wrap. Frost the cake the day you plan to serve it.
What can I use instead of buttermilk?
If you don’t have buttermilk, you can make a substitute by mixing 1 cup of whole milk with 1 tablespoon of lemon juice or white vinegar. Let it sit for 5-10 minutes before using.
How should I store the leftover cake?
Store any leftover cake in an airtight container at room temperature for up to 3 days. If you live in a warm climate, it’s best to refrigerate the cake to keep the frosting from melting.
Can I freeze this cake?
Yes, you can freeze the cake layers or the fully assembled cake. Wrap the cake tightly in plastic wrap, then in aluminum foil. Freeze for up to 3 months. Thaw the cake in the refrigerator before serving.
Conclusion
This Matilda Chocolate Cake is rich, simple to make, and full of deep chocolate flavor. My kitchen smells amazing every time I bake it.
The Matilda Chocolate Cake has become a favorite I love sharing. It brings joy with every slice. I hope you feel the same excitement when you try it.
Don’t wait too long this one’s worth it. My easy Matilda Chocolate Cake is here for you, and I truly hope you give it a try soon.
Here’s More Amazing Chocolate Cakes
Strawberry Filling Chocolate Cake
Strawberry Chocolate Mousse Cake
Matilda Chocolate Cake
Equipment
- 2 mixing bowls
- Whisk and spatula
- electric mixer, (optional)
- Measuring cups and spoons
- Two 9-inch round cake pans
- Saucepan
- Wire cooling rack
- Serrated knife (for leveling, optional)
Ingredients
For the Chocolate Cake:
- 2 cups 240g all-purpose flour
- 2 cups 400g granulated sugar
- ¾ cup 65g unsweetened cocoa powder
- 1 tsp baking soda
- 1 tsp baking powder
- 1 tsp salt
- ⅓ cup 80ml buttermilk
- ⅓ cup 80ml whole milk
- 1 tsp white vinegar
- ½ cup 120ml vegetable oil
- 2 large eggs
- ⅔ cup 135g light brown sugar
- 1 cup 240g sour cream
- ¾ cup 180ml boiling water
- 1 cup 240ml hot brewed coffee
- 1 tsp vanilla extract
For the Chocolate Fudge Frosting:
- 8 oz 225g cream cheese, softened
- 3 to 4 cups 360–480g powdered sugar, to taste
- ½ cup 45g cocoa powder
- ¼ cup 60ml heavy cream
- 300 g 10.5 oz dark chocolate, melted
- 3 tbsp corn syrup
- ¼ tsp salt
Instructions
Preheat Oven and Prepare Pans
- Preheat your oven to 350°F (175°C). Grease and flour two 9-inch round cake pans or line them with parchment paper.
Mix Dry Ingredients
- In a large bowl, whisk together the flour, granulated sugar, cocoa powder, baking soda, baking powder, and salt until well combined.
Combine Wet Ingredients
- In a separate bowl, whisk the buttermilk, whole milk, vinegar, vegetable oil, eggs, brown sugar, sour cream, and vanilla extract until smooth.
Combine Wet and Dry
- Gradually add the wet ingredients to the dry ingredients. Mix until just combined, scraping down the sides of the bowl as needed.
Add Hot Liquids
- Carefully stir in the boiling water and hot coffee. The batter will be thin—this helps make the cake moist and rich.
Bake
- Divide the batter evenly between the two prepared pans. Bake for 30–35 minutes or until a toothpick inserted in the center comes out clean.
Cool the Cakes
- Allow the cakes to cool in the pans for 10 minutes, then transfer them to a wire rack to cool completely before frosting.
Prepare Frosting
- In a large mixing bowl, beat the cream cheese until smooth. Gradually add powdered sugar, cocoa powder, and salt. Stir in the heavy cream, melted dark chocolate, and corn syrup until smooth and fluffy.
Assemble the Cake
- Once cakes are fully cooled, level them if needed. Place one layer on a cake stand, spread frosting evenly on top, then add the second layer. Cover the entire cake with the remaining frosting.
Chill and Serve
- Refrigerate the cake for at least 30 minutes to set the frosting. Slice and serve at room temperature for best texture and flavor.