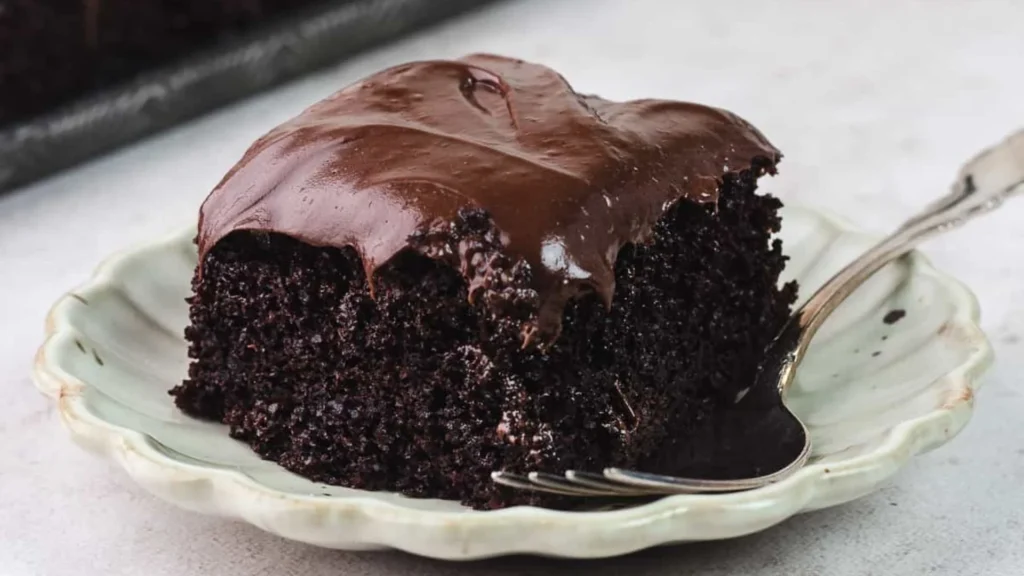
Chocolate buttermilk cake is a rich, moist dessert made from cocoa, butter, eggs, and tangy buttermilk that creates a tender texture and deep chocolate flavor.
I have made this chocolate buttermilk cake several times at home, adjusting sweetness and cocoa levels to match my taste.
I chose to add a homemade cocoa icing instead of store-bought frosting, giving it a creamier, more flavorful finish. The process allowed me to experiment with temperature and baking time for better texture.
This chocolate buttermilk cake brings joy and comfort every time I bake it, and I want to share my step-by-step method for achieving a delicious, bakery-style cake with my personal touch.
About This Chocolate Buttermilk Cake
The chocolate buttermilk cake has a rich, deep chocolate flavor that feels indulgent without being overly sweet. The texture is moist and tender, almost melting on the tongue, while the cocoa butter icing adds a creamy, slightly tangy contrast.
Sweetness is balanced by the slight acidity of the buttermilk, giving the cake a light, airy feel despite its richness. The chocolate notes are intense but gentle, leaving a lingering taste that invites another slice.
The overall experience is comforting, decadent, and deeply flavorful, making the cake memorable and enjoyable.
How To Prepare Chocolate Buttermilk Cake?
Recipe Overview
Preparation Time: 20 minutes
Cooking Time: 40 minutes
Total Time: 60 minutes
Course: Dessert / Cake
Cuisine: American
Yield: 12 servings
Kitchen Utensils
- Mixing bowls
- Measuring cups and spoons
- Whisk and spatula
- Saucepan
- 9×13 inch baking pan
- Sifter
- Cooling rack
Ingredients
For the Cake:
- 240 ml buttermilk
- 2 large eggs (≈100 g)
- 225 g unsalted butter
- 75 g cocoa powder
- 160 ml water
- 1 tsp baking soda (≈5 g)
- 250 g all-purpose flour
- 400 g sugar
- 1 tsp salt (≈5 g)
- 2 tsp vanilla extract (≈10 ml)
For the Icing:
- 3 tbsp cocoa powder (≈15 g)
- 6 to 8 tbsp buttermilk (≈90–120 ml)
- 1 (16-ounce) box powdered sugar (≈450 g)
- 1/2 cup unsalted butter (≈115 g)
- 1 tsp vanilla extract (≈5 ml)
How to Make Chocolate Buttermilk Cake
1. Preheat the oven to 175°C (350°F). Grease a 9×13 inch baking pan and lightly dust it with flour. Melt 225 g of butter together with 75 g of cocoa powder and 160 ml of water in a saucepan over medium heat. Take it off the heat and let it cool for a few minutes.
2. Beat 2 eggs with 240 ml of buttermilk and 2 teaspoons of vanilla extract in a bowl. Stir in the cooled butter-cocoa mixture until it is well blended.
3. Sift 250 g of flour, 400 g of sugar, 1 teaspoon of baking soda, and 1 teaspoon of salt into another bowl. Carefully fold the dry ingredients into the wet mixture until the batter is smooth and uniform.
4. Pour the batter into the prepared pan. Bake for 35–40 minutes. Test the center with a toothpick; it should come out clean. Allow the cake to cool completely on a rack.
5. For the icing, melt 115 g of butter over low heat. Stir in 15 g of cocoa powder. Remove from heat and whisk in 450 g of powdered sugar and 90–120 ml of buttermilk until smooth. Add 1 teaspoon of vanilla extract. Adjust the amount of buttermilk until the icing reaches the consistency you want.
6. Spread the icing over the cooled cake. Cut into squares and serve. Store any leftovers in an airtight container for 2–3 days.
Notes: Use room temperature eggs for better texture. You can substitute regular milk with buttermilk, but the cake may be less moist. For extra richness, add a pinch of espresso powder to enhance the chocolate flavor.
Nutrition Facts Of Chocolate Buttermilk Cake
| Nutrition | Amounts |
|---|---|
| Calories | 420 kcal |
| Protein | 5 g |
| Fat | 18 g |
| Carbohydrates | 60 g |
| Sugar | 45 g |
Why It’s a Favorite Among Dessert Lovers?
Chocolate buttermilk cake is a favorite among dessert lovers because of its rich, moist texture and deep chocolate flavor that feels indulgent without being overly sweet.
The slight tang from the buttermilk enhances the chocolate, creating a balanced taste that appeals to many palates. The creamy cocoa icing adds smoothness and sweetness, making each slice comforting and satisfying.
Its tender crumb and melt-in-the-mouth quality give a sense of homemade warmth while still feeling special, which draws people to it repeatedly.
This cake captures both richness and lightness, earning its place as a beloved dessert.
Why My Recipe Works
My chocolate buttermilk cake recipe works because the ingredients and methods create a balance of flavor, texture, and moisture.
Buttermilk reacts with baking soda to make the cake light and tender while adding a subtle tang that enhances the chocolate.
Melting butter with cocoa intensifies the chocolate flavor and ensures even distribution throughout the batter. Gradually mixing dry and wet ingredients prevents over mixing, keeping the crumb soft.
The cocoa icing, made with butter and buttermilk, adds smooth richness that complements the cake without overpowering it. Careful baking ensures a moist, evenly cooked cake every time.
Best Decorate Ideas
Decorating chocolate buttermilk cake can be simple yet stunning. Start by spreading a smooth layer of chocolate buttercream all over the cake for a classic look.
Add texture by swirling the frosting with a spatula or creating soft peaks with a piping bag. For extra flair, sprinkle chocolate shavings, cocoa nibs, or fresh berries on top.
A dusting of powdered sugar or edible flowers can add elegance. Keep decorations minimal to let the rich chocolate flavor shine while making the cake look irresistible and inviting.
Serving Suggestions
Serve the chocolate buttermilk cake on its own for a rich, indulgent treat, or pair it with fresh berries such as strawberries or raspberries to add a bright, fruity contrast.
The cake goes well with coffee or hot chocolate, enhancing the dessert experience. Cut into squares or slices for easy sharing, making it perfect for gatherings or casual family moments.
The natural flavor and moist texture of the cake make it enjoyable without any extra toppings, allowing the chocolate and buttermilk combination to shine.
Professional Baking Tips
1. Always measure ingredients carefully. Use a kitchen scale whenever possible for flour, sugar, and butter. Even small differences can affect texture and rise.
2. Keep ingredients at the right temperature. Butter, eggs, and milk often perform best when brought to room temperature. Cold ingredients can slow mixing and prevent proper emulsification.
3. Don’t over mix the batter. Stir until ingredients are just combined. Overworking can make cakes dense and muffins tough.
4. Check your oven temperature. Use an oven thermometer to ensure accuracy, since many ovens run hotter or cooler than their settings. This helps prevent under baked or dry results.
5. Prepare pans properly. Greasing and lightly flouring pans or using parchment paper prevents sticking and ensures smooth edges.
6. Cool baked goods correctly. Allow cakes, cookies, or bread to rest on a wire rack before cutting or icing. Trapped heat or steam can affect texture and icing consistency.
Storage Instructions
Let baked items cool completely before storing. Keep cakes, brownies, or cookies in an airtight container to maintain freshness.
Store at room temperature for up to 2–3 days. For longer storage, wrap tightly in plastic wrap or foil and place in the refrigerator for up to a week.
For even longer preservation, freeze baked goods in a sealed container or freezer bag. Most items can be frozen for 2–3 months. Thaw at room temperature before serving, or warm slightly in the oven for a fresh-baked taste.
FAQs About Chocolate Buttermilk Cake
Could the cake turn out dense or gummy? What causes that?
Why does this cake stay moist and tender for days?
Can I substitute oil for butter in the cake?
This recipe already uses both melted butter and canola oil for moisture and richness, but replacing butter entirely with oil may change the flavor and texture.
How do I prevent the cake from drying out?
Avoid overbaking and store the cake properly in an airtight container. Adding buttermilk and oil helps keep the cake moist.
Can I adjust flavor or richness without breaking the recipe?
Conclusion
I’m so glad to share this chocolate buttermilk cake recipe with you, and I hope you find as much joy making it as I did. The rich, moist cake and creamy frosting bring happiness to every bite.
Baking this chocolate buttermilk cake can turn any day into a special occasion. I’m confident it will become a favorite in your home.
Enjoy the delicious results and the smiles chocolate buttermilk cake creates around your table!
More Cake Recipes You’ll Love
Southern Pecan Caramel Cake | Best Popular
Healthy Peanut Butter Cake (With Mug)
Hostess Sheet Cake Recipe | Everyone Loves
Purple Velvet Cake Recipe | American-style
Swedish Apple Cake – Special Taste
Chocolate Buttermilk Cake
Equipment
- Mixing bowls
- Measuring cups and spoons
- Whisk and spatula
- Saucepan
- 9×13 inch baking pan,
- Sifter
- Cooling rack
Ingredients
For the Cake:
- 240 ml buttermilk
- 2 large eggs ≈100 g
- 225 g unsalted butter
- 75 g cocoa powder
- 160 ml water
- 1 tsp baking soda ≈5 g
- 250 g all-purpose flour
- 400 g sugar
- 1 tsp salt ≈5 g
- 2 tsp vanilla extract ≈10 ml
For the Icing:
- 3 tbsp cocoa powder ≈15 g
- 6 to 8 tbsp buttermilk ≈90–120 ml
- 1 16-ounce box powdered sugar (≈450 g)
- 1/2 cup unsalted butter ≈115 g
- 1 tsp vanilla extract ≈5 ml
Instructions
- Preheat the oven to 175°C (350°F). Grease a 9×13 inch baking pan and lightly dust it with flour. Melt 225 g of butter together with 75 g of cocoa powder and 160 ml of water in a saucepan over medium heat. Take it off the heat and let it cool for a few minutes.
- Beat 2 eggs with 240 ml of buttermilk and 2 teaspoons of vanilla extract in a bowl. Stir in the cooled butter-cocoa mixture until it is well blended.
- Sift 250 g of flour, 400 g of sugar, 1 teaspoon of baking soda, and 1 teaspoon of salt into another bowl. Carefully fold the dry ingredients into the wet mixture until the batter is smooth and uniform.
- Pour the batter into the prepared pan. Bake for 35–40 minutes. Test the center with a toothpick; it should come out clean. Allow the cake to cool completely on a rack.
- For the icing, melt 115 g of butter over low heat. Stir in 15 g of cocoa powder. Remove from heat and whisk in 450 g of powdered sugar and 90–120 ml of buttermilk until smooth. Add 1 teaspoon of vanilla extract. Adjust the amount of buttermilk until the icing reaches the consistency you want.
- Spread the icing over the cooled cake. Cut into squares and serve. Store any leftovers in an airtight container for 2–3 days.